
- Creating a schedule consists many times in an infinite combination where the solution is very difficult to find even when using a computer.
- We have elaborted this tutorial with tips for you to assemble your schedule without falling into the common traps to this procedure.
- If you have done the Easy Schedule test already you know that the procedure consists of 6 easy steps to complete.
In case you haven't done it yet, start the free trial to learn what is Easy Schedule. - Step 1 - Basic informations about the schedule
- This step consists in registering an identificiation to your schedule
- You can register 1 or more schedules in your Easy Schedule account. Use these four fields to identify them your own way.
- View an example:
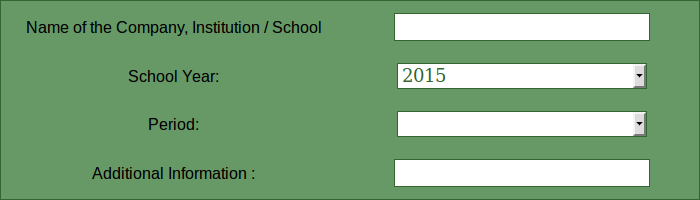
- The fields are not required.
- Then click on "Next Step " on the bottom of the screen or at the top of the right side.
- Step 2 - Creating the working week
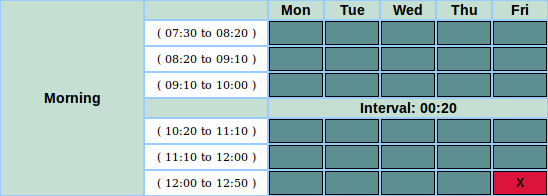
- The first challenge when creating your schedule is to properly assemble the working week of your institution, because this step will be crucial for the remaining of the process. The week should accurately represent the days and schedules in which the institution works:
- Example 1: Week beginning the first class at 7:30, 6 lessons per day, except Friday that lacks the last class. 50 minute lessons and a 20 minute break after the 3rd lesson of the day.
- Do not leave this stage until your week is perfectly represented.
- Common question: If some classrooms have different schedules, how can I assemble my week?
- Answer: If for example you are setting up the schedule of an high school (6 lessons per day) and of an elementary school (5 lessons per day) then you should create your week with the longer period. In step 4, you have the option to block that last schedule to the elementary school classrooms.
- Only mount the schedule that way if the professors are shared between these classrooms in different working schedules. Otherwise, create a schedule to the elementary school and another one to the high school. The cost will be the same for the total number of classrooms.
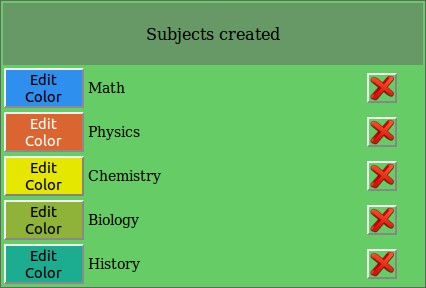
- Step 3 - Subjects
- Step 3 is extremely simple. Just register each subject that will be lectured in this schedule and set a color for it. The system automatically sets a color to a new created subject You can change it by clicking in the button Edit Color.
- View an example
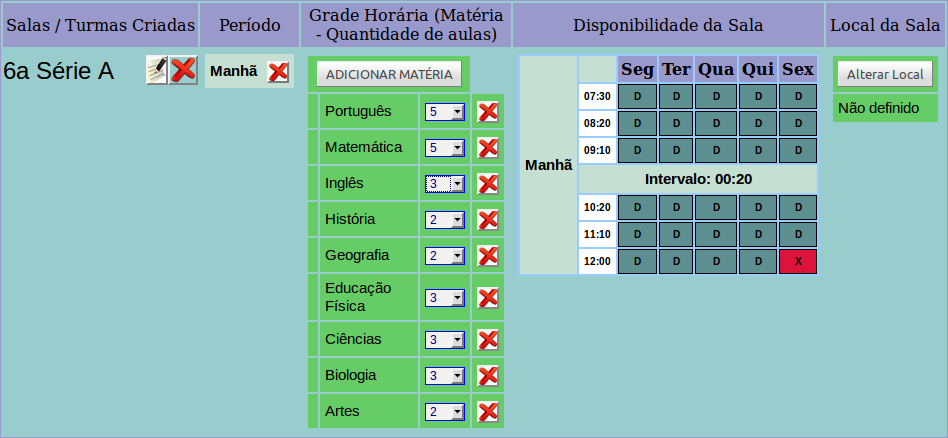
- Step 4 - Classrooms and schedule grid
- In this step you should enter which are the classrooms and the curricular schedule grid of each one of them.
- View the options of Step 4:

- Each classroom can optionally have a restriction of working schedule Therefore, each classroom has a week table that you created in step 2, where you can enable / disable the operation of the classroom.
- Use this option if you are, for example, building a high school or elementary school schedule with shared professors bewteen the two school levels, where the high school has 6 lessons per day and the elementary school has 5 lessons per day.
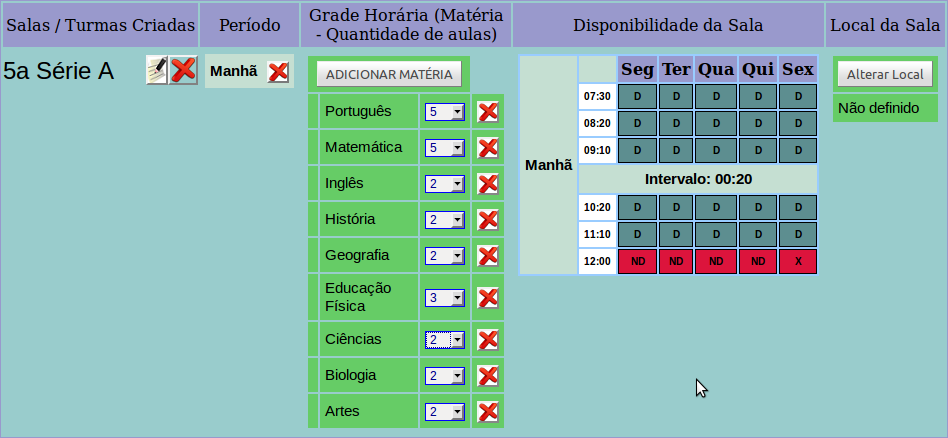
- View an example: "Classroom: 1o. Middle Year" without any working restrictions and Classroom 5th Series A that does not work in the last schedule every day.
- Example with a association of lessons: Classrooms "5th Series A" and "6th Series A" do Gym Class together.
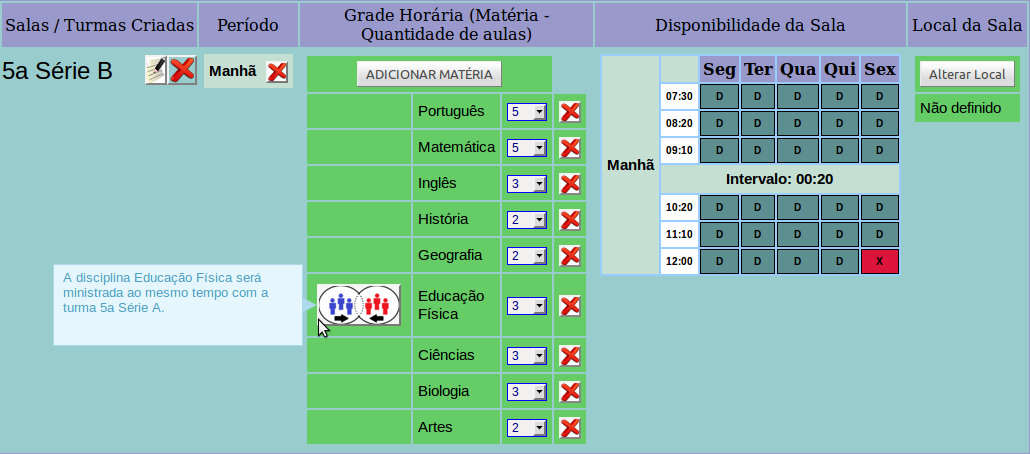
- A lesson's association can only be created between classrooms that have the same subject and quantity as a weekly schedule grid.
- Step 5 - Professors
- This is the most important step and it is the one that causes the majority of doubts and registration errors. You should inform which are the professors, which are the subjects that they lecture as well as their own availability.
- View all the options of Step 5:

- * A school schedule has a solution if there is a minimum number of hours-professor enough to meet the demand registered in step 4 (Classrooms and Scheudle Grid). While the P button is showing, you are sure that the solution is not possible.
- Each professor, as well as the classrooms, may optionally have a scheudle restriction available. Each professor has their own table of the week, which was created in step 2, where you can enable, disable or set as unwanted each availability schedule.
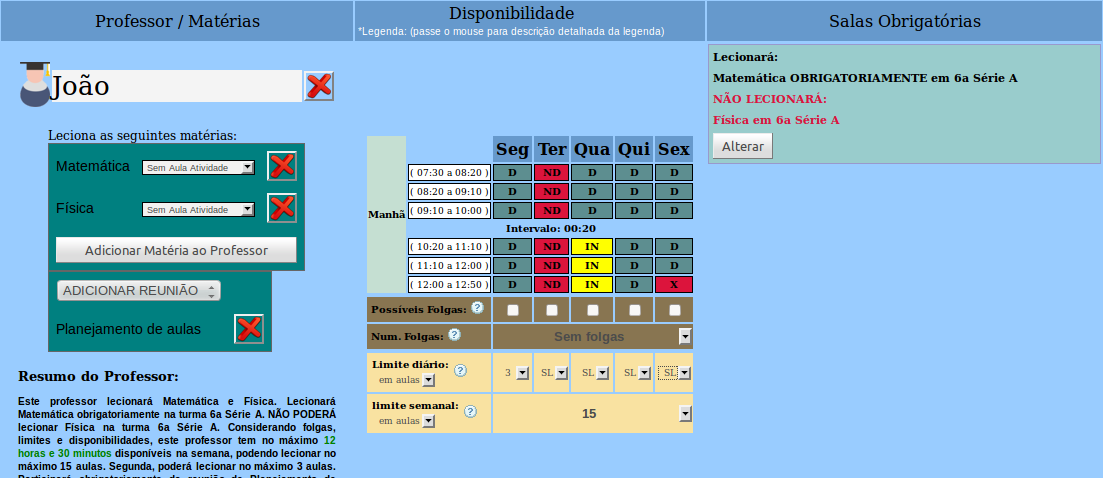
- View an example: Professor José who lectures Math and Physics, CANNOT lecture on Tuesday, HE PREFERS not to lecture on Wednesday in the last 3 hours, lectures up to 15 classes a week, being that on Monday he may lecture up to 3 classes. It does not have any registered days off. MUST Lecture Math in the 6th. Series A and CANNOT lecture Physics in the 6th Series A. IT MAY lecture Physics and Math in any other classroom that it needs. It will attend the weekly meeting called "Planning lessons".
- Availibilities and Days Off
- In Easy Schedule the availability of the professor can be checked in 2 ways as well as they can be combined.: Blocking the week's schedules / or informing about days off / fixed.
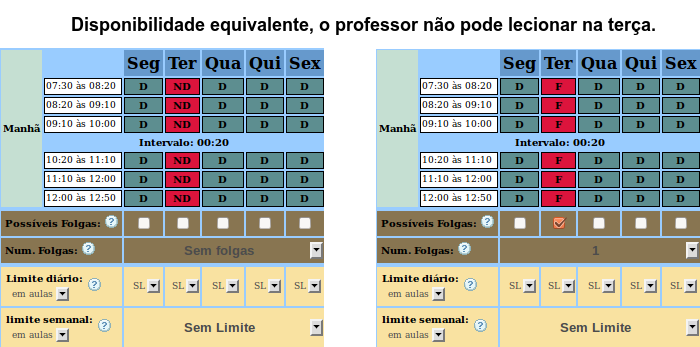
- If the professor cannot lecture on tuesday, you can set that day off in 2 different ways. View an example:
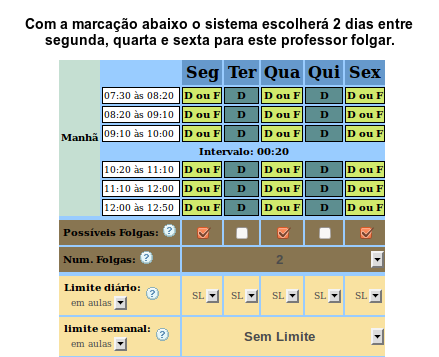
- If the professor should have one day off, but not in a specific day, you should use the days off to set that availability. View below:
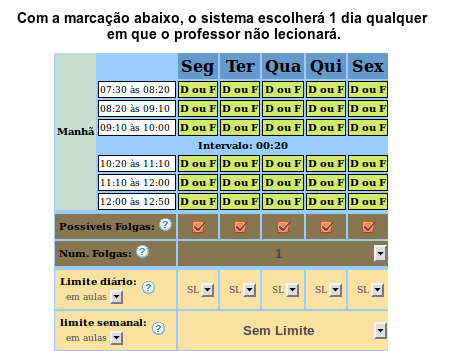
- We designate by days off when the professor should take at least 1 day off, but that day is not set. Using the days off is less restrictive than marking the schedules in red, because Easy Schedule will have a bigger probability of handling lessons avoiding locking the other professors and consequentially increasing the solution's probability. However, with the days off the suggestions' calculation is much more complex and there may be a case where the system can not give a good suggestion in order improving the schedule. Consequently we recommend to use the days off after obtaining at least one viable solution and having analyzed the system's suggestions.
- View other combinations:

- COMMON MISTAKES WHEN REGISTERING A PROFESSOR
- View the example below:
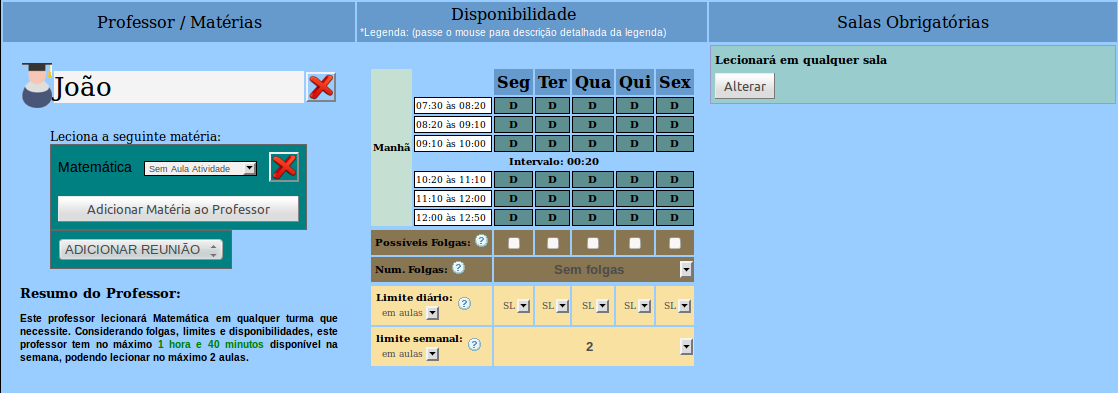
- NOT RECOMMENDED PROCEDURES
- View the example below:
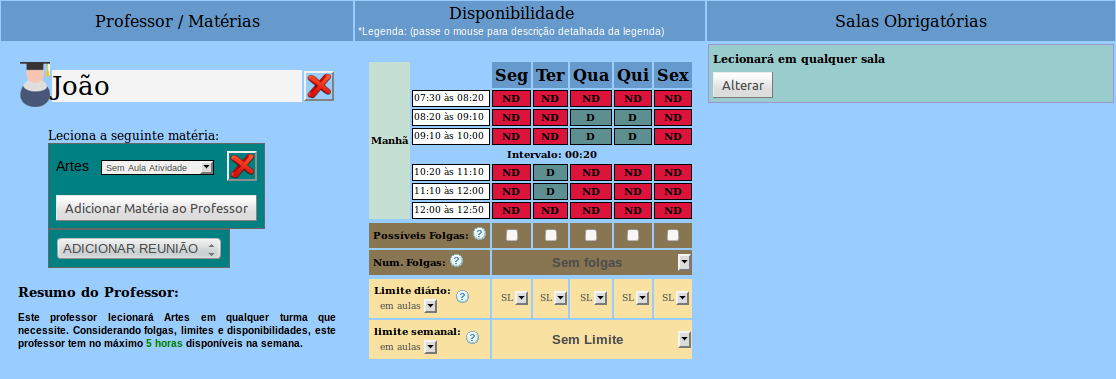
- Do not try to duplicate the professor's schedule by closing all of his availabilities. Only mark in red the days / schedules that the professor cannot really lecture. By doing the availability registration as shown above, you can make the schedule of the harmed professors, because Easy Schedule will obligatorily allocate the professors' subjects in these schedules leaving very few options for the rest of the professors.
By doing a similar procedure for all professors, it will make the possibility of the solution to be remote due to the very few handling options in the lessons' allocation.
Instead, mark in red only the days that the professor cannot really lecture and let Easy Schedule to duplicate and minimize the days of the professors automatically. - Step 6 - Duplicated Lessons / Configurations
- In step 6 you have the options to finish your schedule and leave it more comfortable for your professors and students, besides being able to set the processing priorities and the possibility of fixing schedules.

- The following explains the functionality of each item:
- Duplicated Lessons (General, by Professor, by Subject and Detailed)
- You have the option to limit how much your schedule can be duplicated. View the options.:
- Non-Specified
- By not specifying the type of the duplicated lesson, Easy Schedule will allocate the schedules without this restriction. The lessons can be together or not, they can be all together or totally separated if needed. This option is the least restrictive of all.
View an example of the solution with this option: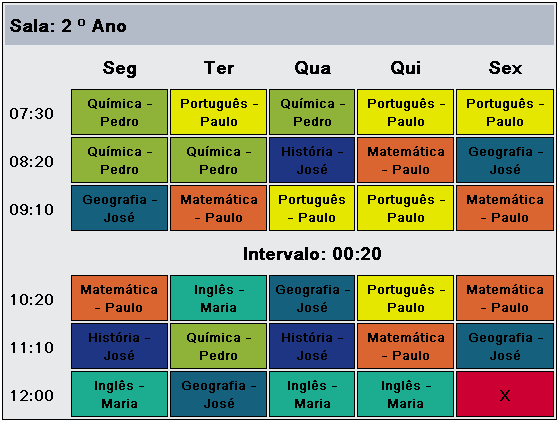
- Don't Duplicate - The system will try to separate all lessons allowing them to be intercalated
- Mark this option if in your schedule, for whatever reason, it is not interesting to have followed by lessons. Easy Schedule will try to intersperse classes if possible.
View an example of the solution with this option: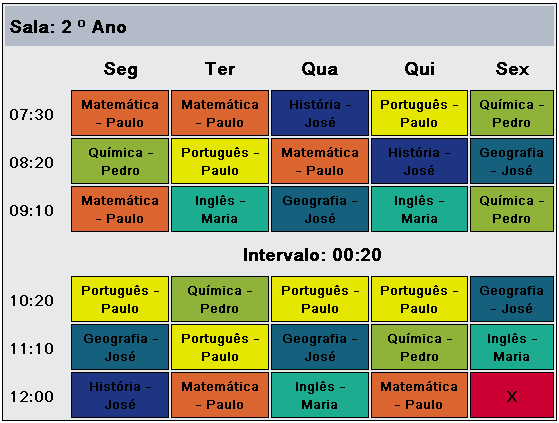
- Don't Duplicate - The system will only allow 1 lesson of each subject per day
- Unlike the previous option, this one highly restrictive. It means that Easy Schedule will only allow 1 subject from a lesson in the day and consequently will not duplicate.
- We recommend this option ONLY in very specific cases and small schedules.
- Mandatory Duplicating - The system will only allow double lessons of this subject or professor.
- This option is highly restrictive. It means that Easy Schedule will not allow only 1 lesson of a certain subject per day. This option is only availible to Duplicate per Professor and Subject.
- Use this option carefully, for example to gym class, lab, etc...
- 2 - The system will try to group 2 lessons at most (2 in a row)
- Less restrictive than the previous option this will make Easy Schedule try to group at most 2 lessons in a row in the day.
View an example of the solution with this option: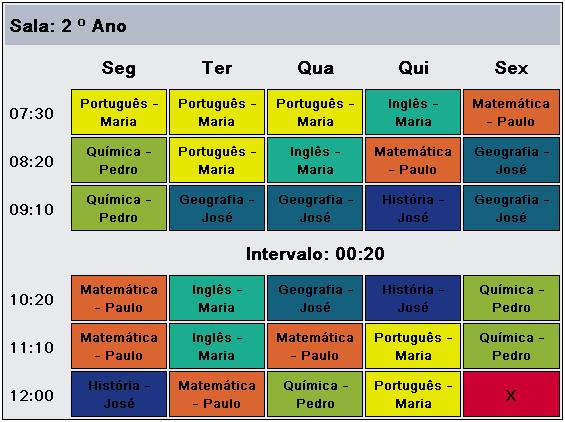
- 3 - The system will try to group 3 lessons at most (3 in a row)
- Less restrictive than the previous option this will make Easy Schedule try to group at most 3 lessons in a row in the day.
View an example of the solution with this option:
- 4 - The system will try to group 4 lessons at most (4 in a row)
- Less restrictive than the previous option this will make Easy Schedule try to group at most 4 lessons in a row in the day.
- 5 - The system will try to group 5 lessons at most (5 in a row)
- Less restrictive than the previous option this will make Easy Schedule try to group at most 5 lessons in a row in the day.
- Duplicate with No Limit - The system will try to group the most possible.
- Less restrictive than the previous option this will make Easy Schedule try to group the maximum possible of lessons in the day.
- Set Schedules
- This option is highly restrictive in case its used. Fixing a schedule may harm other professors and even derail a possible solution of your schedule.
Only use this option if you already have experience in creating schedules and you know the consequences of fixing a professors' schedule.
Para fixar um horário simplesmente clique com o mouse no horário desejado em seguida selecione a matéria a ser alocada. Caso a matéria tenha mais de 1 professor, você deverá selecionar qual professor será alocado. - Processing Parameters
- This option is used to instruct our servers about what should or should not be included in the next processing. Besides that, it is possible to determine which processing items are the most important for your schedule defining a processing order.
For example, if for a certain schedule it is more important to "Delete the Vacancies of the Professors" than "Duplicating the Schedule", then place a MINOR ORDER for the first item. Easy Schedule always runs accordingly to these parameters and when unable to find a solution of a certain restriction, it automatically eases these options in order to give you a preview of the solution, so you can make the necessary adjustments and reprocess.
Here are the options of the Processing Parameters: - Classrooms' Availability
- Performs the processing in accordance with the availability of the classrooms registered in STEP 4. This option cannot be disabled and its order cannot be changed.
- Professors' Availability
- Performs the processing in accordance with the availability of the professors registered in STEP 5. We designate availability by the block schedules alongside with the registered days off. This option cannot be disabled and its order cannot be changed.
- Atribuição de Turmas
- In step 5 you have the option of fixing the professors in the classrooms, however you should know exactly where to allocate the professor if you have chosen to use this feature, because the Schedule Easy automatically allocates professors in order to give the best solution in terms of the other grouped restrictions. If you want Easy Schedule to choose which professor should be allocated in the classrooms instead of their choices, uncheck to do this without having to change all that you have registered in step 5.
- Professors with priority in the lessons' allocation
- If there is competition between professors who lecture the same subjects for the same classrooms, Easy Schedule will first allocate professors with higher priority to finish filling the grid. Set priorities for the allocation of professors in step 5
- Daily Limits
- Easy Schedule will try to allocate professors respecting the daily limits established in STEP 5, unless you disable this option.
- Weekly Limits
- Easy Schedule will try to allocate professors respecting the weekly limits established in STEP 5, unless you disable this option.
- Fixed Schedules
- Easy Schedule will try to respect the fixed schedules that were designated in STEP 6, unless you disable this option.
- Minimize the days of the professors
- If your schedule has 5 daily lessons and one of its professors have a weekly workload of 5 lessons, it would be interesting that this professor worked in 1 day only, but how to solve this problem for all professors respecting their availibilities and all other restrictions. This is generally the biggest mistake we find in our registrations to create schedules. Many try to minimize the professors' days by closing all of their availabilities in step 5. This is an extremely not recommended procedure and it will only make the probability of the solution to be remote. Easy Schedule minimizes automatically the days of the professors unless this option is disabled. Therefore, in step 5, only block the professors' availability in the days / schedules, in which he really cannot lecture and let Easy Schedule minimize their work days leaving this option enabled.
- Delete the Professors' Vacancies
- This is one of the most requested problems in schedule creation. Em muitas instituições, horários vagos para os professores são remunerados causando prejuizos para a mesma. Quando não são remunerados causam desconforto para os professores que tem o horário ocioso em seu expediente.
Por padrão, o Horário Fácil sempre eliminará as janelas dos professores a menos que você desabilite esta opção. - Interspersed Lessons
- In general, interspersed lessons cause discomfort for students and teachers. It means for example a class having math followed by Portuguese then math again. By default, Easy Schedule will always try to eliminate the interspersed lessons unless this option is disabled.
- Vacancies in the students' schedule
- Vacancies in the students' schedule for the same cause discomfort and disruption in the institution because imagine what students will do in time vacant while awaiting the next class. By default Easy Schedule will always try to remove the vacancies in the schedule of the students unless this option is disabled.
- Configuration of Duplicated Lessons
- At this stage there are 6 options to define the settings for duplicated lessons per subject, per teacher, general or detailed. Disabling this processing parameters item is equivalent to run the solution of your schedule with all the options settings for duplicated lessons set to "UNSPECIFIED ".
- Solutions Editor - Create or edit the grid solutions
- Easy Schedule's solutions editor allows you to create your own solution or edit an existing solution that may have been created by the Easy Schedule's Staff or by the user itself.
- This tool was created with the purpose of enabling the creation of solutions in a semi-manual way, blocking the common mistakes of this procedure and allowing to find the possible availability problems or fitting lessons of professors in the classrooms.
- Meet Easy Schedule's editor - Watch the videos below:
- Learn how to select a combination Classroom - Professor - (Subject):
- Alocating profressors in the classrooms:
- Visualization problems
- Easy Schedule's pages are best viewed with browsers Internet browser sGoogle Chrome or FireFox IN THEIR MOST RECENT VERSIONS in a screen resolution of 1200 x 768 or higher.
- If you are using an old version of internet explorer may may be some display problems such as scroll bars do not show and slow loading speed.
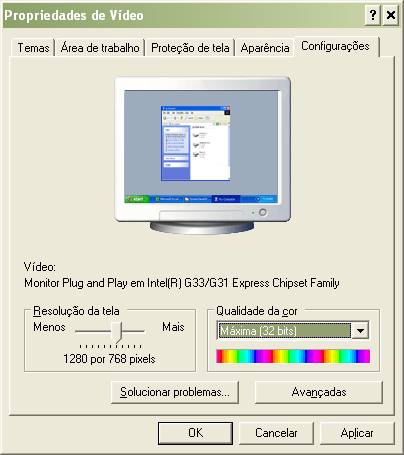
To solve the scroll bars problem, you need to increase the resolution of your system for a minimum of 1200 x 768. - View how to proceed to change the screen resolution in Windows:
- Minimize todas as janelas do seu desktop e CLIQUE COM O BOTÃO DIREITO DO MOUSE ou abra o painel de controle do windows e CLIQUE EM CONFIGURAÇÕES DE VÍDEO.
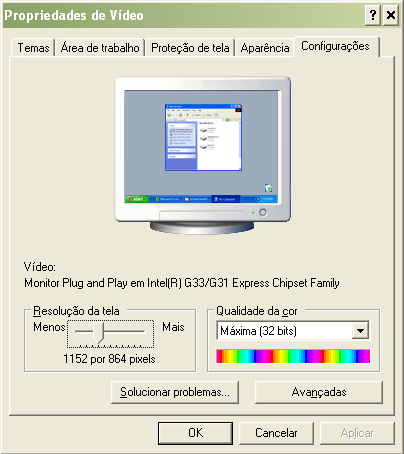
- Next, change the resolution to at least 1200 x 768 or higher and click APPLY and OK.
- If you are still experiencing visualization problems take a print screen with your problem and send it to contato@horariofacil.com so we can help you.